-
Most advanced (PWA) Progressive Web Applications increase better sales and better customer satisfaction.With this App, you can increase your online sales.because Everyone use modern web technologies and design patterns to provide a reliable, fast Work experience.
so we can say All E-commerce owners have already felt the positive result after use PWA. because we provide for App many Features like,
Admin can manage and configure the Opencart PWA settings. Admin can edit the application name, icon, background image Etc, also available many options in admin panel, its Fully Customize App.
Whole Multiple features before Buy can see in Documentations
Progressive Web Applications (PWA)
Installation of Progressive Web Application (PWA) 3.x.x
-
-
Step 1: Zip Extract

Step 2: Show Upload Folder

Step 3
Open Upload Folder > Copy All Folders And Paste In Your FTP Same Location

Step 4
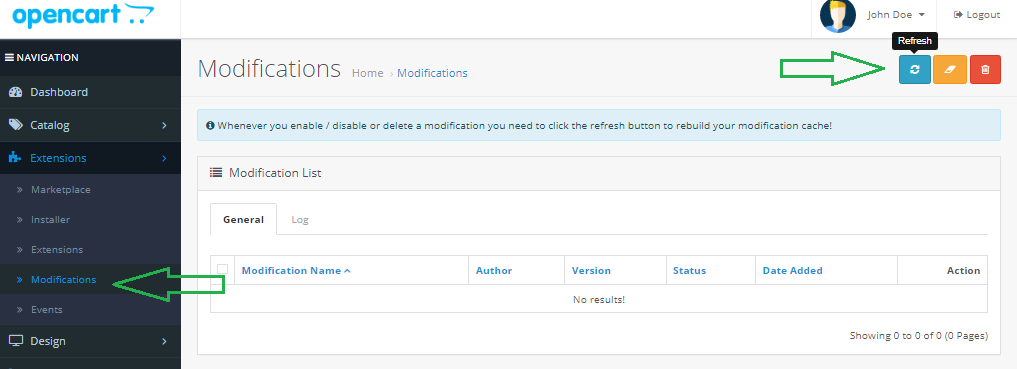
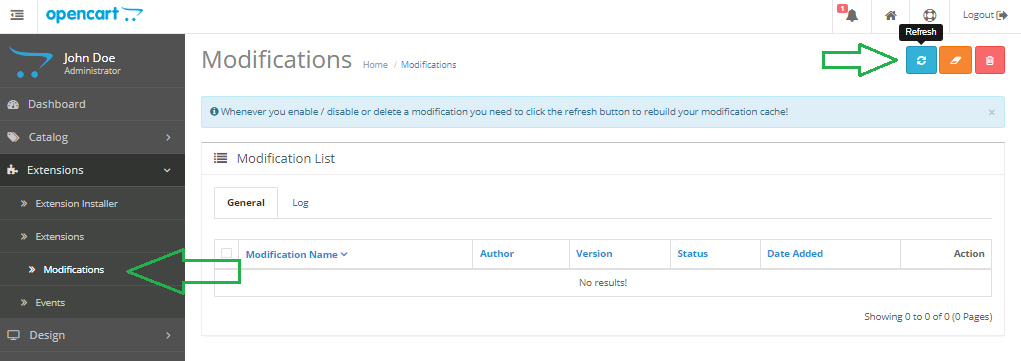
Go To Admin Panel > Extensions > Modifications > Click On Blue Refresh Button
Step 5
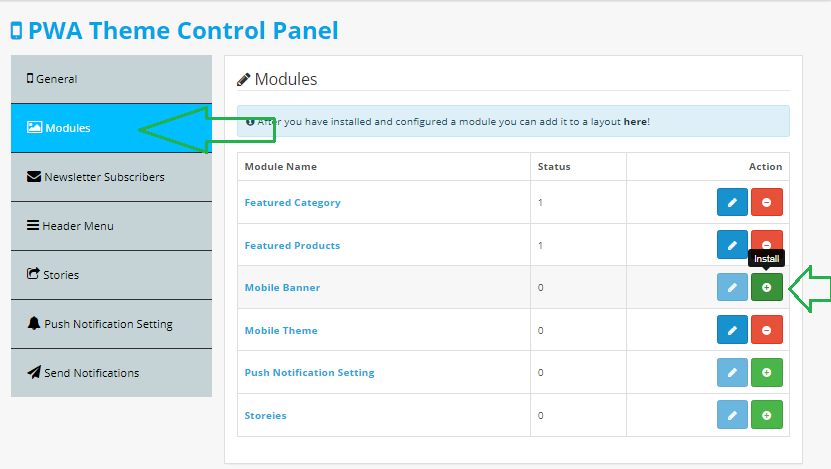
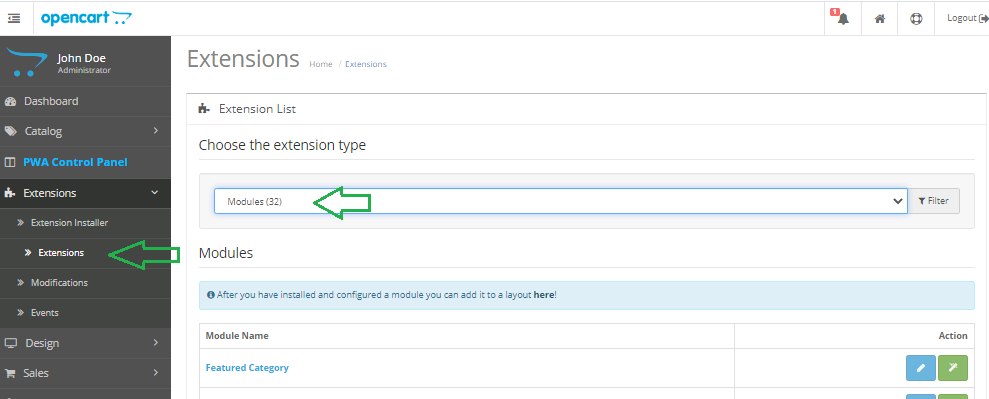
Go To Admin Panel > Extensions > Extensions > Select Module > Click On Mobile Theme Module Green Install Button

Step 6: Go To Admin Panel > System > Users > User Groups > Click Select All And Then Save It

Step 7: PWA Theme Control Panel Menu

Step 8
Push Notification Setting > Fill All Fileds:- Add Messaging Sender Id, API Key, API ACCESS KEY, Project Id,App Id. Order Success Notification:- Select Status, Add Notification Title, Notification Message. Order Status Update Notification:- Select Status, Add Notification Title, Notification Message.

Step 9: General Menu > General Tab Setting
Select Theme Status, Show default Category in Menu, Upload Mobile Logo, Add Logo Height/width, Product image height & width, AllCategory image height & width, Select Enable Request Log Reporting, Add Name for the PWA App, Select App Button Color, App Theme Color, App Splashscreen Color, Upload Image for PWA App Icon, Login Pages Background Image

General Menu > Header Tab Setting
Select Header Logo Position, Select Header Menu Position & icon, Select Cart icon, Select Wishlist Icon

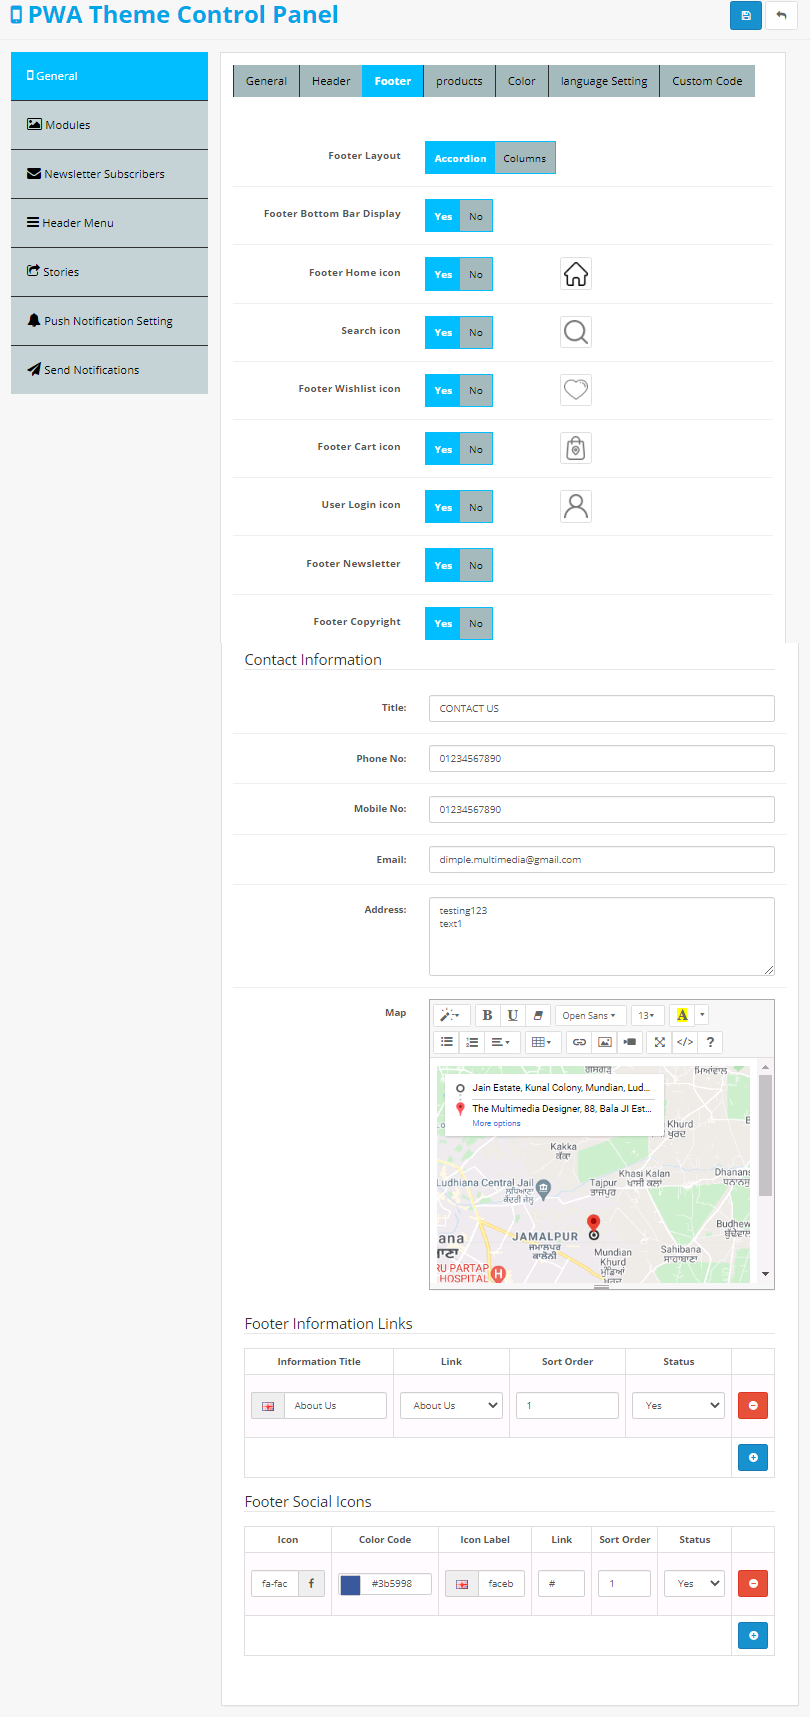
General Menu > Footer Tab Setting
Select Footer Layout, Footer Bottom Bar Display, upload Footer Home icon, Search icon, Footer Wishlist icon, Footer Cart icon, User Login icon, Select Footer Newsletter, Footer Copyright, Footer enable, Add Contact Information:- Title, Phone No, Mobile No, Email, Address, Add Map Code, Add Footer Information Links:- Information Title, Link, Sort Order, Status, Add Footer Social Icons:- Icon, Color Code, Icon Label, Link, Sort Order, Status
General Menu > Product Tab Setting
Select Breadcrumb, Products Description, Products Old Price, Products Tax, Cart Button, Wish Button, Compare Button, Products Rating, Product Page QTY Setting:- Select Quatity Plus-Minus Show

General Menu > Color Tab Setting

General Menu > Language Tab Setting

General Menu > Custom Code Tab and Then Save It

Step 10: Go To Admin Panel > Desgin > Banner > Click On Add New Button

Add Banner Name, Select Status, Upload Slider and Then Save It

Step 11
Go To Admin Panel > Extensions > Extensions > Select Modules

Click Add New Button in Slideshow

Add Module Name, Select Banner, Add Width&Height, Select Status and Then Save It

Step 12: Go To Admin Panel > Desgin > Layout > Click On Home Edit Button > Select mobile slider in mobile top position and Then save it

Mobile View Home page Showing Slider

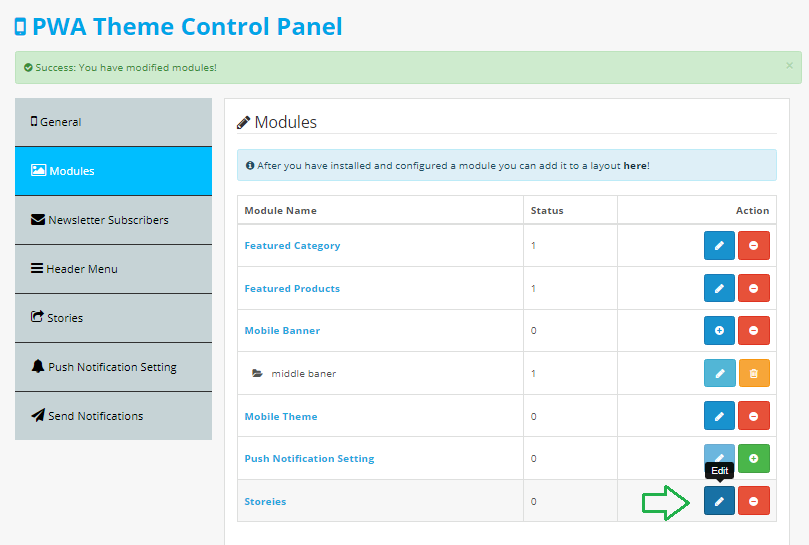
Step 13: Go To Admin Panel > PWA Theme Control Panel > Click Module Tab > Click On Featured Category Module Green Install Button

After Install Click On blue Edit Button

Add Module Name, Select Category List, Select Categories Name Status, Add Product cols, Limit, Select Categories Images Display, Add Width&Height, Select Carousel Status, Navigation Buttons, Status Then Save It

Step 14:
Go To Admin Panel > Desgin > Layout > Click On Home Edit Button > Select Featured Category Module in mobile top position and Then save it

Mobile View Home page Showing Featured Category Module

Step 15:
Go To Admin Panel > Extensions > Extensions > Select Modules > Click Latest Module:- Add Module Name, Limit, Width&Height, Select Status and Then save It

Step 16:
Go To Admin Panel > Desgin > Layout > Click On Home Edit Button > Select new Collection (Latest) Module in mobile top position and Then save it
Mobile View Home page Showing new Collection (Latest) Module

Step 17:
Go To Admin Panel > PWA Theme Control Panel > Click Module Tab > Click On Featured Product Module Green Install Button

After Install Click On blue Edit Button

Add Module Name, Select Products, Add Product cols, Limit, Add Width&Height, Select Carousel Status, Navigation Buttons, Status Then Save It

Step 18:
Go To Admin Panel > Desgin > Layout > Click On Home Edit Button > Select Featured Product Module in mobile top position and Then save it

Mobile View Home page Showing Featured Product Module

Step 19:
Desgin > Banner > Click On Add New Button
Add Banner Name, Select Status, Upload Banner and Then Save It

Step 20:
Go To Admin Panel > PWA Theme Control Panel > Click Module Tab > Click On Mobile Banner Green Install Button
After Install Click On blue Edit Button

Add Module Name, Select Banner, Add Width&Height, Add colums, Select Status Then Save It

Step 21:
Go To Admin Panel > Desgin > Layout > Click On Home Edit Button > Select middle banner Module in mobile top position and Then save it

Mobile View Home page Showing Middle Banner

Step 22:
Go To Admin Panel > Extensions > Extensions > Select Modules > Click Special Module:- Add Module Name, Limit, Width&Height, Select Status and Then save It

Step 23:
Go To Admin Panel > Desgin > Layout > Click On Home Edit Button > Select recent (Special) Module in mobile top position and Then save it

Mobile View Home page Showing recent (Special) Module

Step 24:
Go To Admin Panel > PWA Theme Control Panel > Click Stories Tab > Click On Add New Button
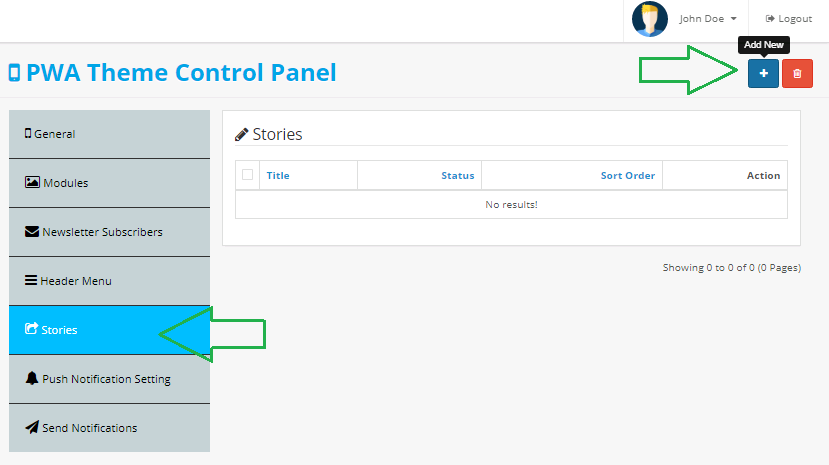
Add Title, Stories Text, Link, upload Image, User Image, Add Size, Length, Select Status, Add Sort Order and Then save It

Step 25:
Go To Admin Panel > PWA Theme Control Panel > Click Module Tab > Click On Storeies Green Install Button

After Install Click On blue Edit Button
Add Module Name, Add Width&Height, Select Status Then Save It

Step 26:
Go To Admin Panel > Desgin > Layout > Click On Home Edit Button > Select Storeies Module in mobile top position and Then save it

Mobile View Home page Storeies

Step 27:
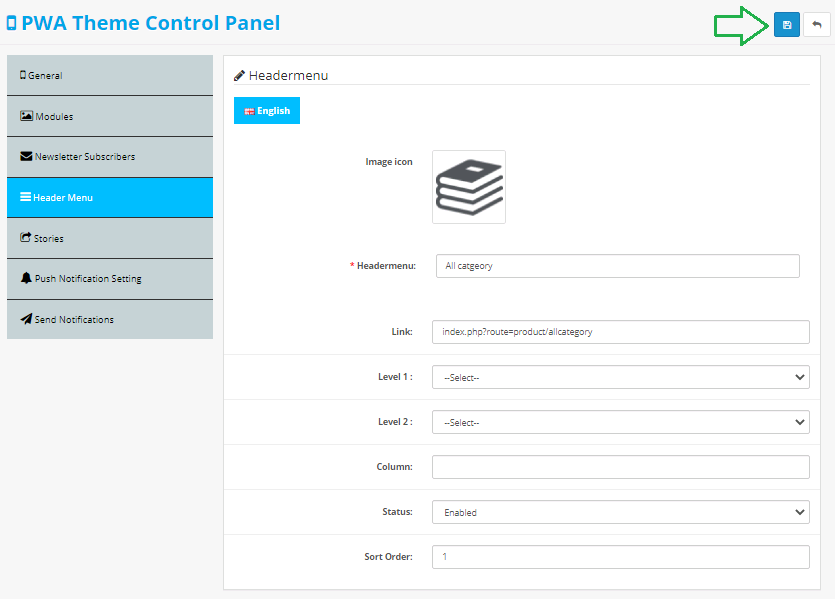
Go To Admin Panel > PWA Theme Control Panel > Click Header Menu Tab > Click On Add New Button

Upload Image icon, Add Headermenu Title, Add Link, Select Status, Add Sort Order Ans Then save it
Mobile View Home page Header Menu Module

Click Header Menu Icon Shwoing Entry

Step 28:
Go To Admin Panel > PWA Theme Control Panel > Click Send Notification Tab > Click On Add New Button

Add Title, Message, Upload Image, Select devices, Select Redirected and Then save It

Showing Notification

Step 29:
Go To Admin Panel > Desgin > Banner > Click On Add New Button > Add Category Page Banner

Add Category Page Slider

Step 30:
Go To Admin Panel > Extensions > Extensions > Select Module > Click On Slidshow Add New Button > Add Entry and Then save It

Step 31:
Go To Admin Panel > Desgin > Layout > Click On Home Edit Button > Select recent (Special) Module in mobile top position and Then save it

Step 32:
Go To Admin Panel > Desgin > Layout > Click On Add New Button > Select Mobile Banner , Slidshow Module in mobile top position and Then save it

Mobile View Click All Category

Showing category slider and category banner

-
Installation of Progressive Web Application (PWA) 2.3.x
-
-
Step 1: Zip Extract

Step 2: Show Upload Folder
Step 3
Open Upload Folder > Copy All Folders And Paste In Your FTP Same Location
Step 4
Go To Admin Panel > Extensions > Modifications > Click On Refresh Button
Step 5
Go To Admin Panel > Extensions > Extensions > Select Module > Click On Mobile Theme Module Green Install Button

Step 6: Go To Admin Panel > System > Users > User Groups > Click Select All And Then Save It

Step 7: PWA Theme Control Panel Menu

Step 8: Push Notification Setting > Fill All Fileds:- Add Messaging Sender Id, API Key, API ACCESS KEY, Project Id,App Id. Order Success Notification:- Select Status, Add Notification Title, Notification Message. Order Status Update Notification:- Select Status, Add Notification Title, Notification Message.

Step 9: General Menu > General Tab Setting
Select Theme Status, Show default Category in Menu, Upload Mobile Logo, Add Logo Height/width, Product image height & width, AllCategory image height & width, Select Enable Request Log Reporting, Add Name for the PWA App, Select App Button Color, App Theme Color, App Splashscreen Color, Upload Image for PWA App Icon, Login Pages Background Image
General Menu > Header Tab Setting
Select Header Logo Position, Select Header Menu Position & icon, Select Cart icon, Select Wishlist Icon
General Menu > Footer Tab Setting
Select Footer Layout, Footer Bottom Bar Display, upload Footer Home icon, Search icon, Footer Wishlist icon, Footer Cart icon, User Login icon, Select Footer Newsletter, Footer Copyright, Footer enable, Add Contact Information:- Title, Phone No, Mobile No, Email, Address, Add Map Code, Add Footer Information Links:- Information Title, Link, Sort Order, Status, Add Footer Social Icons:- Icon, Color Code, Icon Label, Link, Sort Order, Status
General Menu > Product Tab Setting
Select Breadcrumb, Products Description, Products Old Price, Products Tax, Cart Button, Wish Button, Compare Button, Products Rating, Product Page QTY Setting:- Select Quatity Plus-Minus Show
General Menu > Color Tab Setting
Select Color:- Theme Text Color, Body Bg Color, Header Bg Color, Header Icon & Text Color, Menu Bg Color, Menus Link Color, Footer Bg Color, Footer Icon & Text Color, Footer link hover Color, Footer heading Color, Button Bg Color, Button Bg hover Color, Button Text Color, Subscribe Btn, Add To Cart Btn, Buy Now Btn, Product Name color, Product Name Hover, Price color, Qty plus/minus color
General Menu > Language Tab Setting
General Menu > Custom Code Tab and Then Save It
Step 10: Go To Admin Panel > Desgin > Banner > Click On Add New Button

Add Banner Name, Select Status, Upload Slider and Then Save It
Step 11
Go To Admin Panel > Extensions > Extensions > Select Modules
Click Add New Button in Slideshow
Add Module Name, Select Banner, Add Width&Height, Select Status and Then Save It
Step 12: Go To Admin Panel > Desgin > Layout > Click On Home Edit Button > Select mobile slider in mobile top position and Then save it

Mobile View Home page Showing Slider
Step 13: Go To Admin Panel > PWA Theme Control Panel > Click Module Tab > Click On Featured Category Module Green Install Button
After Install Click On blue Edit Button
Add Module Name, Select Category List, Select Categories Name Status, Add Product cols, Limit, Select Categories Images Display, Add Width&Height, Select Carousel Status, Navigation Buttons, Status Then Save It
Step 14:
Go To Admin Panel > Desgin > Layout > Click On Home Edit Button > Select Featured Category Module in mobile top position and Then save it
Mobile View Home page Showing Featured Category Module
Step 15:
Go To Admin Panel > Extensions > Extensions > Select Modules > Click Latest Module:- Add Module Name, Limit, Width&Height, Select Status and Then save It
Step 16:
Go To Admin Panel > Desgin > Layout > Click On Home Edit Button > Select new Collection (Latest) Module in mobile top position and Then save it
Mobile View Home page Showing new Collection (Latest) Module
Step 17:
Go To Admin Panel > PWA Theme Control Panel > Click Module Tab > Click On Featured Product Module Green Install Button
After Install Click On blue Edit Button
Add Module Name, Select Products, Add Product cols, Limit, Add Width&Height, Select Carousel Status, Navigation Buttons, Status Then Save It
Step 18:
Go To Admin Panel > Desgin > Layout > Click On Home Edit Button > Select Featured Product Module in mobile top position and Then save it
Mobile View Home page Showing Featured Product Module
Step 19:
Desgin > Banner > Click On Add New Button
Add Banner Name, Select Status, Upload Banner and Then Save It

Step 20:
Go To Admin Panel > PWA Theme Control Panel > Click Module Tab > Click On Mobile Banner Green Install Button
After Install Click On blue Edit Button
Add Module Name, Select Banner, Add Width&Height, Add colums, Select Status Then Save It
Step 21:
Go To Admin Panel > Desgin > Layout > Click On Home Edit Button > Select middle banner Module in mobile top position and Then save it
Mobile View Home page Showing Middle Banner
Step 22:
Go To Admin Panel > Extensions > Extensions > Select Modules > Click Special Module:- Add Module Name, Limit, Width&Height, Select Status and Then save It
Step 23:
Go To Admin Panel > Desgin > Layout > Click On Home Edit Button > Select recent (Special) Module in mobile top position and Then save it
Mobile View Home page Showing recent (Special) Module
Step 24:
Go To Admin Panel > PWA Theme Control Panel > Click Stories Tab > Click On Add New Button
Add Title, Stories Text, Link, upload Image, User Image, Add Size, Length, Select Status, Add Sort Order and Then save It
Step 25:
Go To Admin Panel > PWA Theme Control Panel > Click Module Tab > Click On Storeies Green Install Button
After Install Click On blue Edit Button
Add Module Name, Add Width&Height, Select Status Then Save It
Step 26:
Go To Admin Panel > Desgin > Layout > Click On Home Edit Button > Select Storeies Module in mobile top position and Then save it
Mobile View Home page Storeies
Step 27:
Go To Admin Panel > PWA Theme Control Panel > Click Header Menu Tab > Click On Add New Button
Upload Image icon, Add Headermenu Title, Add Link, Select Status, Add Sort Order Ans Then save it
Mobile View Home page Header Menu Module
Click Header Menu Icon Shwoing Entry
Step 28:
Go To Admin Panel > PWA Theme Control Panel > Click Send Notification Tab > Click On Add New Button
Add Title, Message, Upload Image, Select devices, Select Redirected and Then save It
Showing Notification
Step 29:
Go To Admin Panel > Desgin > Banner > Click On Add New Button > Add Category Page Banner
Add Category Page Slider
Step 30:
Go To Admin Panel > Extensions > Extensions > Select Module > Click On Slidshow Add New Button > Add Entry and Then save It
Step 31:
Go To Admin Panel > Desgin > Layout > Click On Home Edit Button > Select recent (Special) Module in mobile top position and Then save it

Step 32:
Go To Admin Panel > Desgin > Layout > Click On Add New Button > Select Mobile Banner , Slidshow Module in mobile top position and Then save it
Mobile View Click All Category
Showing category slider and category banner
-
How To Make Firebase Application
-
- First Open This URL https://console.firebase.google.com/
Step 1: Click Create a project

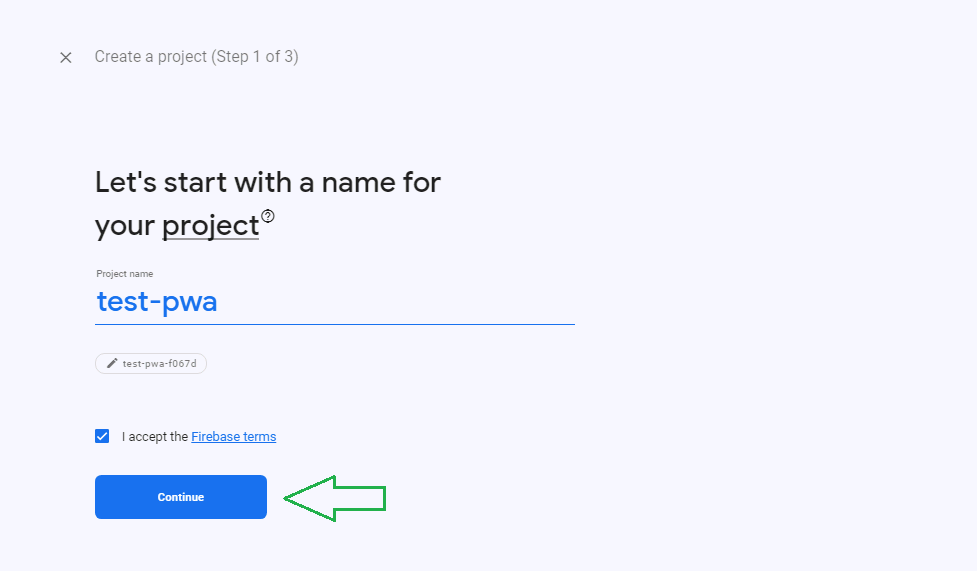
Step 2: Add Project Name and accept Firebase terms Then Click On Continue Button
Step 3: Again Click On Continue Button

Step 4: Select Location , accept Google Analytics terms Then Click On Create project

Step 5: Project is Ready Click On Continue Button

Step 6: Open This Page And Click Web App Button

Step 7: Add nickname Click Firebase Hosting Then Click Register App Button and Again Click Next , Next Button

Step 8: After Click Next Button Open This Page Click PWA

Step 9: open Popup Click seeting Button

Step 10: General Tab Showing Project Information

Step 11: Cloud Messaging Tab Show key and click on Web Push certificates Generate Key pair

Step 12: Go To Admin Panel > PWA Theme Control Panel Menu > Click Push Notification Setting > Add Messaging Sender Id, API Key, API ACCESS KEY, Project Id, App Id Then Save It

- First Open This URL https://console.firebase.google.com/
Contact Us
If you have question which is beyond this knowledgebase Kindly contact us
Write to Us Now