-
Grocery Store is a multi functional, user-friendly and responsive OpenCart theme that
has been designed to assist small and medium-sized Grocery store shops for exhibiting, listing, and marketing farming products.
The theme provides convenience to boost the Grocery items sales on stores with its simple yet effective design.
The OpenCart theme makes it possible to create your own Grocery store website with different setup customization.
A built-in theme Control panel is included for you to start running your website within days not only for Grocery Item
products but anything you want to Sale.
Grocery Store Theme
Installation of Grocery Store Theme 4.x.x (responsive theme)
-
Step 1: Zip Folder

Step 2
Go To Admin Panel > Extensions > Installer > Click Blue Button

Step 3: Upload TMD grocerystore Theme Zip

Step 4: After zip Upload Click Green Install Button Please 4 Mint wait

Step 5: Show Message (Success: The extension has been installed!)

Step 5
Go To Admin Panel > Extensions > Extensions > Select Theme > Click Green Install Button

First Generate Key then Enable Status and Then Save It

Step 6
Go To Admin Panel > System > Setting > Edit Store > General Tab > Upload store Logo and Select Theme and then save it

Activate Theme

Step 7
Go To Admin Panel > Extensions > Extensions > Select Module > Click Theme Setting Green Install Button

After Install Click edit Button Enable status and Then save It


Step 8: show menus

Step 9: Theme Controller Menu Setting

Show Description in products , Show Tax in products

Show Map

Step 10: Mega Menu > Click Setting Button


Click Add New Button


Show Mega Menu

Step 11: Go To Admin Panel > Desgin > Banner > Add Slider image

Step 12: Go To Admin Panel > Extensions > Select Module > Add Slider Size

Step 13: Go To Admin Panel > Desgin > Layout > Edit Home > Add module

Show Slider

Step 14: Extensions > Select Module > HTML Service

Step 15: Desgin > Layout > Edit Home > Add module
Show HTML Service Module

Step 16: Extensions > Select Module > HTML About US

Step 17: Desgin > Layout > Edit Home > Add module

Show HTML About US Module

Step 18: Extensions > Select Module > TMD Featured

Step 19: Desgin > Layout > Edit Home > Add module

Show Featured Module

Step 20: Extensions > Select Module > HTML Feature

Step 21: Desgin > Layout > Edit Home > Add module

Show HTML About US Module

Step 21: Blog Menu > Blog Setting Tab > General Tab Setting

Modules Settings(Latest & related) Tab

Blog Page Tab

Blog Category Tab

Adjust Color Tab

Extra Setting Tab

SEO Setting Tab

Blog Category > Click Add New Button

General Tab Setting

Data Tab Setting

Blog > Click Add New Button

General Tab Setting

Data Tab Setting

SEO Tab Setting

Setp 22: Click On TMD Blog Filter Product(TMD) Green Install Button After That Click On Blue Edit Button and Setup The Module Then save It

Setp 23: TMD Category Search

Setp 24: TMD Latest Blog

Setp 25: TMD Related Blog

Setp 26: Desgin > Layout > Edit Home > Select Our Blog Content Bottom Position and Then Save It

Show Latest Blogs

Step 27: Mega Footer Menu > Click Setting Button


Click Add New Button


Show Mega Footer

Step 28: Desgin > Banner > Click New Add Button > Add Banner Name, Upload Image and Then Save It


All Pages Top Banner

Home page

Category page

Product page

About Us Page

Contact Page

Blog Page

Blog Deatil

FAQ Page

Our Team Page

Installation of Grocery Store Theme 3.x.x (responsive theme)
-
-
Step 1: Zip Folder

Step 2:
Go To Admin Panel > Extensions > Installer > Click On Upload Button

Step 3: Upload TMD Grocery Store Theme Zip
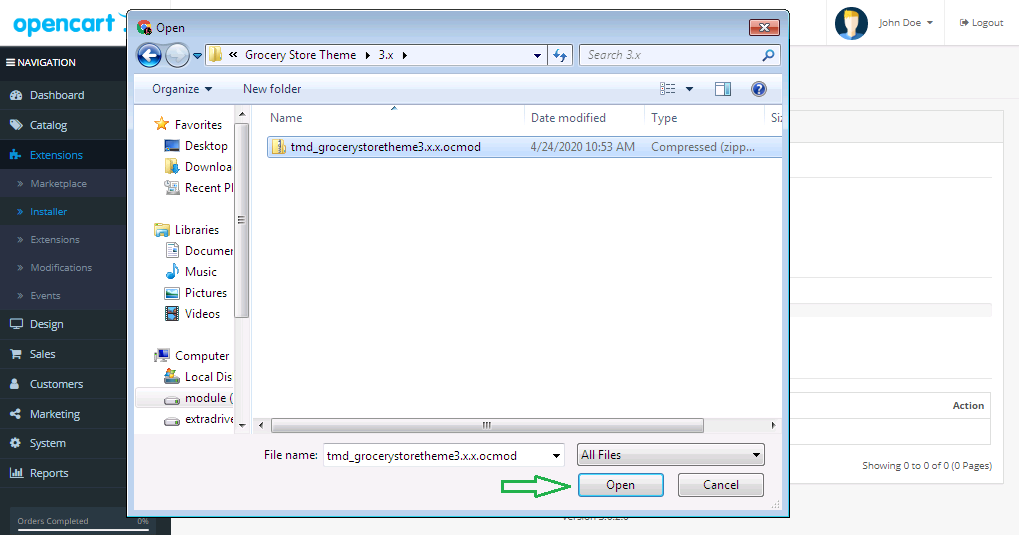
Step 4: After Zip Upload Success Message

Step 5:
Go To Admin Panel > Extensions > Modification > Click On Refresh Button

Step 6:
Go To Admin Panel > Extensions > Extensions > Select Module > Click On TMD Grocery Store Theme Green Install Button Then Sql Update

Step 7:
Go To Admin Panel > System > Users > User Groups > Click Select All and Save It

Step 8: Showing Extra Menus List

Step 9:
Go To Admin Panel > Extensions > Extensions > Select Theme > Click On TMD Grocery Store Theme Green Install Button After That Click On Blue Edit Button

Select Theme, Status, Add Product Image Thumb Size, Product Image Popup Size, Product Image List Size, Related Product Image Size and Then Save It

Step 10:
Go To Admin Panel > System > Setting > General Tab > Select Theme

Click Image Tab > Upload Theme Logo and Save It

Activate Theme

Step 11:
Go To Admin Panel > Extra Menu > Theme Control > Select Theme Main color, Add Map Code and Then save It

Step 12:
Extra Menu > Mega Header > Click On Setting Button

Mega Header > Click On Add New Button

List Mega header

Mega Header
Step 13:
Go To Admin Panel > Desgin > Banner > Edit Home Page Slideshow and Upload Slider Image and Then Save It

Step 14:
Go To Admin Panel > Extensions > Select Module > Edit Home Page Slideshow Add (Width,Height) and Then Save It

Step 15:
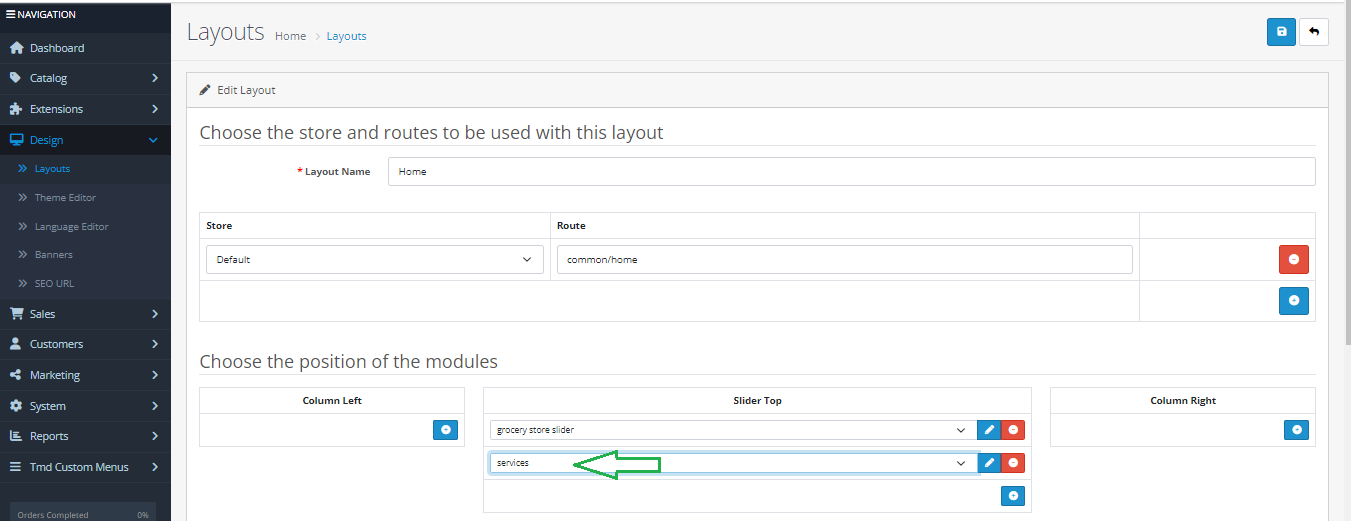
Go To Admin Panel > Desgin > Layout > Edit Home Select Home page Position slider topand Then Save It

Home Page Slider
Step 16:
Go To Admin Panel > Extensions > Select Module > Click On HTML Green Install Button after That Click On Edit Button

Services HTML

About Us HTML

Step 17:
Go To Admin Panel > Desgin > Layout > Edit Home Select Home page Position slider top Position , about us Content Top Position and Then Save It

Services, About Us HTML

Step 18:
Go To Admin Panel > Extensions > Extensions > Select Module > Click On Featured Blue edit button and selct product, add limt, add (Width,Height) and then save it

Step 19:
Go To Admin Panel > Desgin > Layout > Edit Home Select Our best product Content Top Position and Then Save It

Featured Module

Step 20:
Go To Admin Panel > Extensions > Select Module > Click On HTML Blue Edit Button > Add featured Code and then save It

Step 21:
Go To Admin Panel > Desgin > Layout > Edit Home Select Home page Position slider top and Then Save It

Featured HTML

Step 22:
Go To Admin Panel > Extra Menu > Blog Setting Tab > General Tab Setting

Blog Page Tab Setting

Blog Catgeory Tab Setting

Adjust Color Tab Setting and Then Save It

Step 23:
Blog Category Tab > Click Add New Button

General Tab Setting
Data Tab Setting and Then Save It
Step 24:
Blog Tab > Click Add New Button

General Tab Setting

Data Tab Setting and Then Save It

Step 25:
Go To Admin Panel > Extensions > Extensions > Select Module > Click On TMD Blog Filter Product(TMD) Green Install Button After That Click On Blue Edit Button and Setup The Module Then save It
Click On TMD Category Search Green Install Button After That Click On Blue Edit Button and Select Status Then save It
Click On TMD Latest Blog Green Install Button After That Click On Blue Edit Button Add Module Name, Limit, (Width,Height) Then Save It
Click On TMD Related Blog Green Install Button After That Click On Blue Edit Button Add Module Name, Select Products, Limit, (Width,Height) Then Save It
Step 26:
Go To Admin Panel > Desgin > Layout > Edit Home > Select Our Blog Content Bottom Position and Then Save It
Latest Blogs
Step 27:
Go To Admin Panel > Extra Menu > Mega Footer > Click On Setting Button
Click Add Button
Mega Footer List
Mega Footer
Step 28:
Go To Admin Panel > Desgin > Banner > Click New Add Button > Add Banner Name, Upload Image and Then Save It
Step 29:
Go To Admin Panel > Extensions > Extensions > Select Module > Click Banner Add New Button > Add Module Name, Select Banner, Add Width,Height and Then Save It

Step 30:
Go To Admin Panel > Catalog > Information > Click On About Us Edit Button

Click On add new Button > Add This FAQ Page Entry

Click On add new Button > Add This Our Team Page Entry

Information List

Step 31:
Go To Admin Panel > Desgin > Layout > Click On Information Edit Button > Select Slider Top , Newsletter Footer Bottom position Then Save It

About Us Page
FAQ Page
Our Team Page
Step 32:
Go To Admin Panel > Extensions > Extensions > Select Module > Click On Latest Green Install Button After That Click On Blue Edit Button setting module and Then Save It

Step 33:
Go To Admin Panel > Extensions > Extensions > Select Module > Click On Latest Green Install Button After That Click On Blue Edit Button setting module and Then Save It

Category Page
Step 34:
Go To Admin Panel > Desgin > Layout > Click Add New Button > Add Layout Name, Route > Select TMD Category Search, Latest Post Page Blog Right Position and Then Save It

All Blog Category Page
Step 35:
Go To Admin Panel > Desgin > Layout > Click Add New Button > Add Layout Name, Route > Select TMD Category Search, Latest Post Page Blog Right Position and Select Related Blog Content Bottom position Then Save It

Blog Detail Page
Product Page
Contact Us Page
Home Page
-
Contact Us
If you have question which is beyond this knowledgebase Kindly contact us
Write to Us Now